
The Ultimate Guide to SSH Keys: How to Create and Use Them for Secure Remote Connections
By Andreas Bergman
In this post, I’ll guide you through the fundamentals of SSH, setting you on the path for your SSH key journey. By the end, my aim is for you to have enough knowledge so you feel confident in creating and using SSH keys securely.
Why SSH keys?
Some backstory: what are SSH keys? SSH is an acronym (because the CS world can’t have enough of them), and it stands for Secure SHell. It’s a protocol used for secure remote access. But how’s it secure? Well, there are a couple of things that make it secure. First, the communication itself gets encrypted, and the remote access machine can only allow certain keys to connect. Here’s how the connection works:
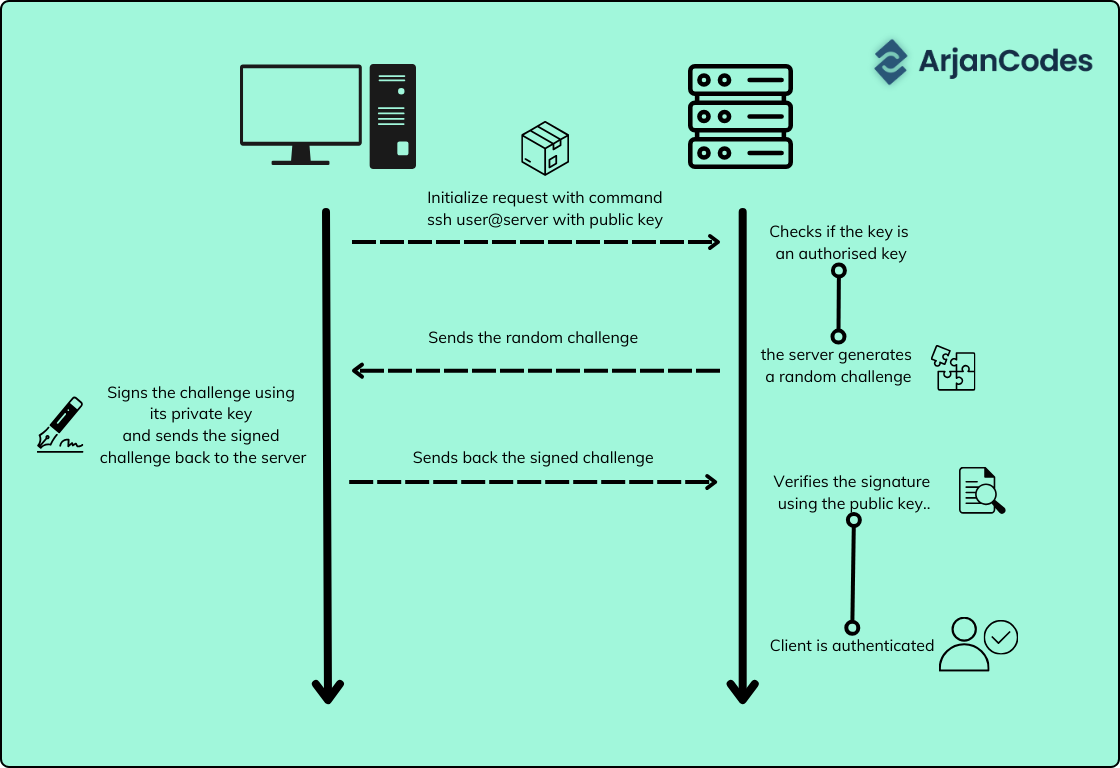
Let’s say you have a cloud server hosted by a famous cloud provider. Only some users are allowed to connect. In order to connect, you’ll need a key pair. The key comes in two parts: one part is your private key (NEVER SHARE THIS), and the other part is your public key (Okay to share).
Now, when you want to connect to a server, the server gives you a special challenge. It’s like a puzzle that only you can solve because you have your private key.
So, you take the challenge and solve it using your private key, creating a digital signature, and you show this digital signature to the server.
The server has a copy of your public key stored in the file ~/authorized_keys. Using the stored public key, the server checks your digital signature. If the digital signature fits with your public key, it means you have the right to remote access the server, and the server lets you in.
Don’t worry!
If you haven’t used SSH keys before, there is a good chance that your computer is not fully set up for it. Don’t worry! Your computer can use SSH out of the box, but there are some things we need to create in order to use SSH effectively, such as where to store the keys that are generated and where the config should be placed.
A current best practice is to store all the SSH keys in an “invisible” folder at the root of your user. Such a directory can be named anything, but the best practice, and highly recommended, is to name it .ssh . The dot of the filename is what makes the folder “invisible”, it’s invisible for the finder application or in a directory view, but using cmd + ., on MacOS and ctrl + H on Various Linux distributions, will display the hidden content. Using the terminal command ls will also display them.
Getting started
If you already have a .ssh folder, good! Then you can skip the following two steps; otherwise:
- Create a .ssh directory with the following command:
mkdir ~/.ssh
- Set permissions to 700 so, for example, Git can access the folder:
chmod 700 ~/.ssh
Having the permission 700 specifies that the owner can read the file (4), write to the file (2) and execute the file (1), resulting in a total permission value of 7. For additional information on the chmod command, you can refer to the documentation.
Now you have a folder where you can store all the SSH keys. To create a key, use ssh-keygen, a command-line tool that generates pairs of cryptographic keys specifically used in the SSH protocol.
Generate a ssh key using ssh-keygen:
ssh-keygen -t ed25519 -a 100 -f ~/.ssh/NAME_OF_KEY
-t stands for which encryption type
-a number of Key derivation function (KDF), which is a cryptographic algorithm that transforms a secret into one or more derived keys, rounds used. Higher numbers result in slower passphrase verification and increased resistance to brute-force password cracking. In other words, a higher number → higher security (a little slower). Default is 16
-f is where the key will be stored and what the name should be
When running the command, you’ll be prompted to do the following:
Generating public/private ed25519 key pair.
Enter passphrase (empty for no passphrase):
Enter a passphrase (password) that is for when the key is used. While optional, it’s best practice and highly recommended to use a passphrase for the private key. Using a passphrase adds an extra layer of security if the private key gets stolen, and there are two ways to do this: either type in a strong password that you remember (not recommended) or let a password manager generate the password. Note: The password will not be displayed in the terminal when you input it.
Voila! I’ve now created a SSH key which I can use to, for example, clone repositories from GitHub so I can do for example code reviews. If you want to learn how to do code reviews, check out my free Code Diagnosis workshop where I teach you the most important things to look for when you want to quickly identify design problems in your code. It’s based on my own experience reviewing code trying to do that efficiently while still finding the problems fast.
Permission
To use the keys for SSH, it’s necessary to define permissions. The command chmod facilitates changes in permissions, and 600 specifies that the owner can read the file (4) and write to the file (2), resulting in a total permission value of 6. For additional information on the chmod command, you can refer to the documentation.
Set permission for the private key:
chmod 600 ~/.ssh/NAME_OF_KEY
The same goes for the public key, however, it needs other permissions. code 644 give the same permission as the private key, but also allows groups and others to read the file. Why do we make it possible for groups and users on the computer to read the public key? Well, it’s because we want our public key to be shared!
So, let’s set the permission for the public key:
chmod 644 ~/.ssh/NAME_OF_KEY.pub
Tip: In general, do this for all your public keys that are stored under ~/.ssh
If you navigate to the .ssh folder, you now have two ed25519 encrypted keys. One key is public → NAME_OF_KEY.pub (.pub extension is short of public), and the other key is your private key → NAME_OF_KEY
cd ~/.ssh && ls
NAME_of_KEY NAME_OF_KEY.pub
Finally, we’re done! The key pair is created which can be used for ssh to remotely access resources such as accounts, servers, and more.
Final thoughts
In theory, you can use the same key-pair combo for all your connections, but in terms of security, it is not recommended. Unfortunately, the famous quote from The Lord of the Rings: “one ring to rule them all” doesn’t apply to keys: use multiple keys to rule them all. That way, if you lose one key, you will still be able to rule the vast majority of them all. I recommend that you create a separate key-pair and a new passphrase for each remote access connection.